Website Widget: Embedding Frank on Your Site
Place an AI interview directly on your own website, app, checkout page, recruitment page, or partner site — participants complete the full voice interview without ever leaving the page.
Overview
The Frank website widget lets researchers embed an AI interview directly into their own digital experience, instead of sending participants to a separate Frank-hosted link.
Why this is needed
Normally, researchers share interviews using a Frank-hosted link. Participants have to open a separate page, enter their details, go through pre-join steps, and then enter the interview room. This can feel disconnected from the site where the participant started, and may create unnecessary drop-off.
With the widget, feedback is collected directly within the researcher's own website or app — making the interview feel more natural and reducing friction for participants.
How it works for researchers
Once a research project is ready to be shared, an Embed option becomes available alongside the regular AI interviewer link. From the installation screen, researchers can:
- Choose how the widget appears on their website (currently only the Floating widget type is available)
- Customize its appearance to match their brand
- Decide how participants are identified
- Configure the introductory content and consent options
- Select where the widget appears on the page
- Preview the participant experience
- Copy the installation code and add it to their website
Tip: The widget is designed to work on both desktop and mobile devices.
The Install Screen: "Install Frank on your site"
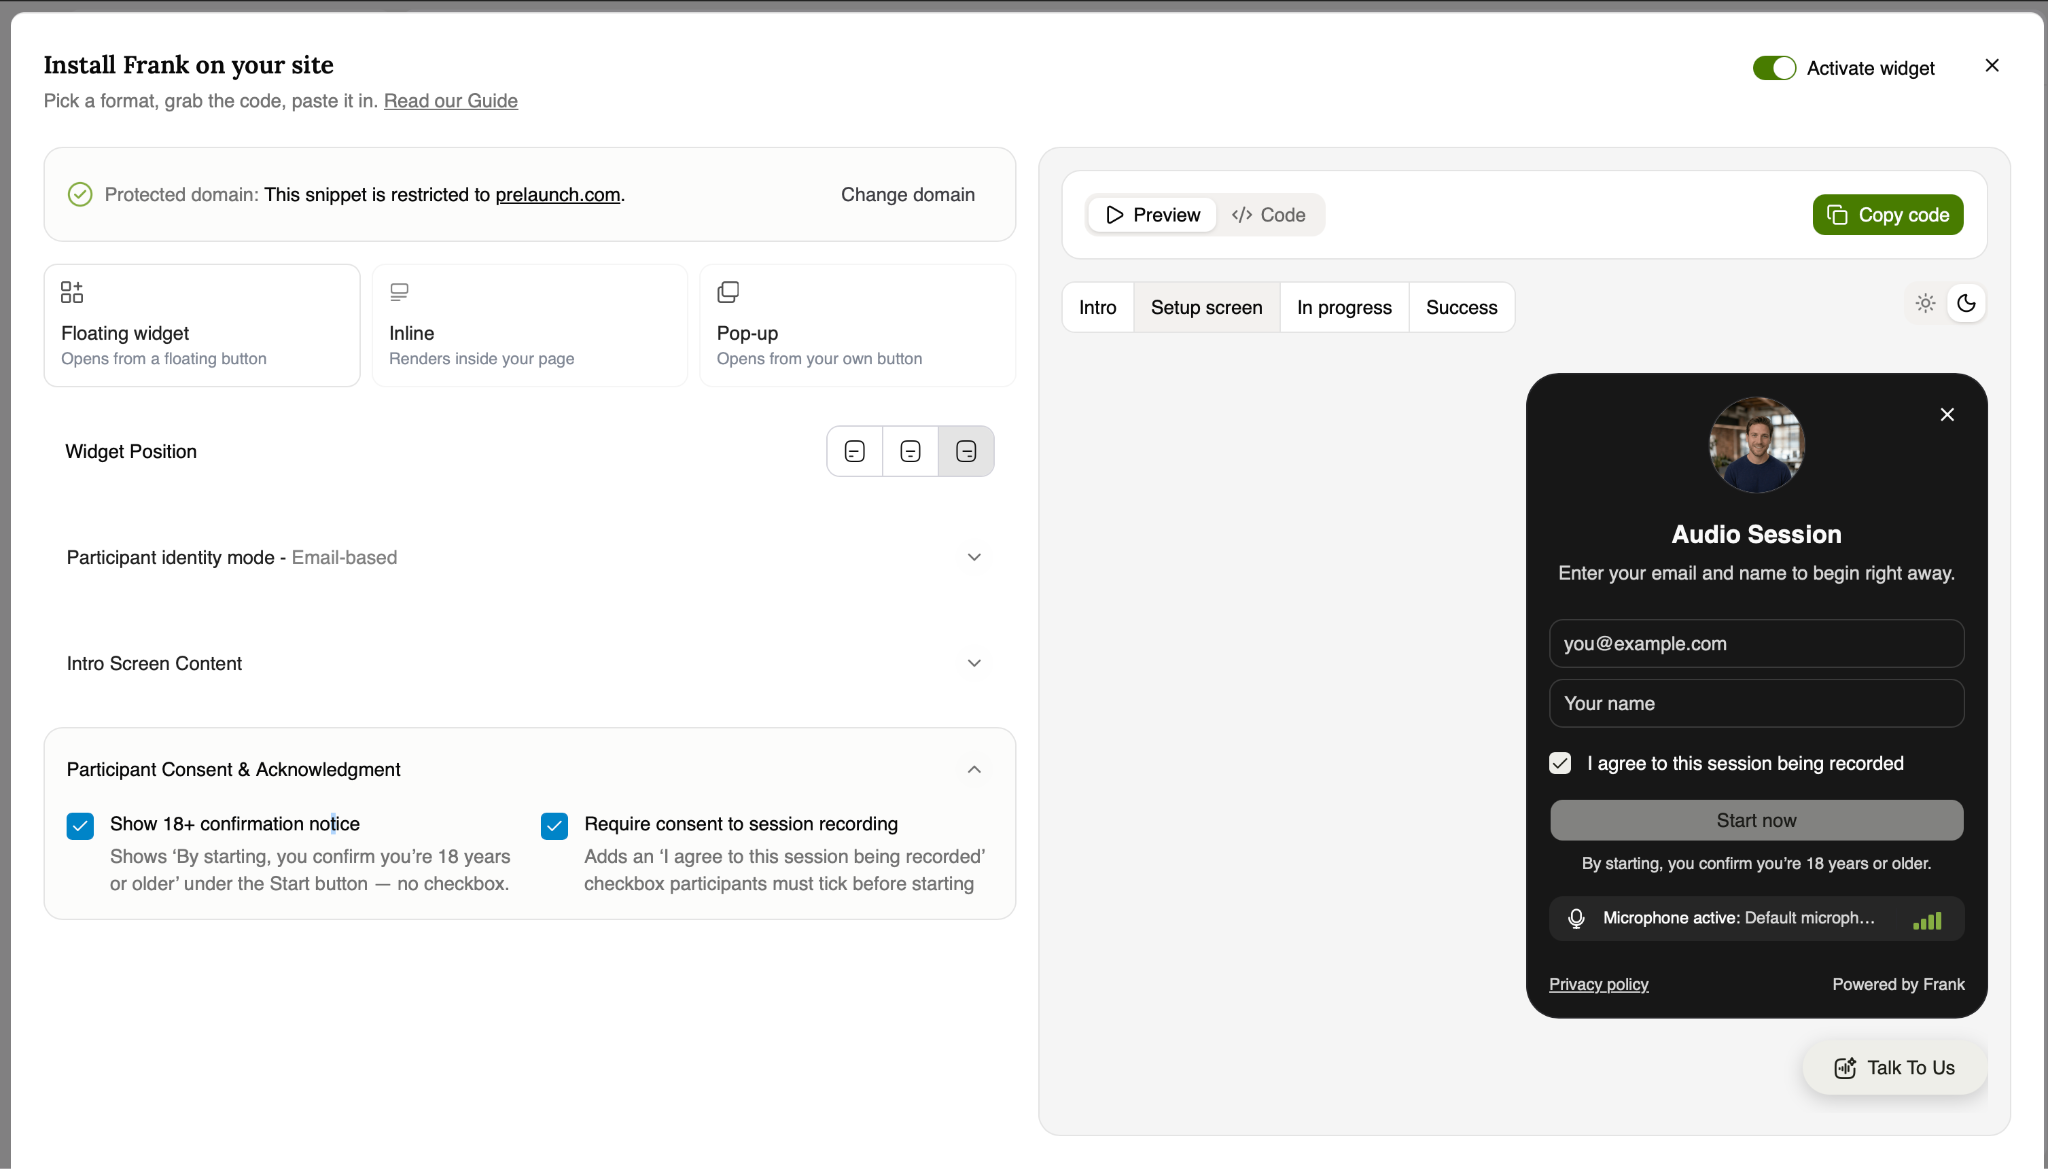
This is a split-screen configuration modal: settings on the left, a live Preview (or Code) view on the right.
Header controls
- Activate widget — toggle that turns the embedded widget on or off site-wide
- Read our Guide — link to setup documentation
- Protected domain — shows the domain the install snippet is restricted to (e.g., "prelaunch.com"), with a Change domain link
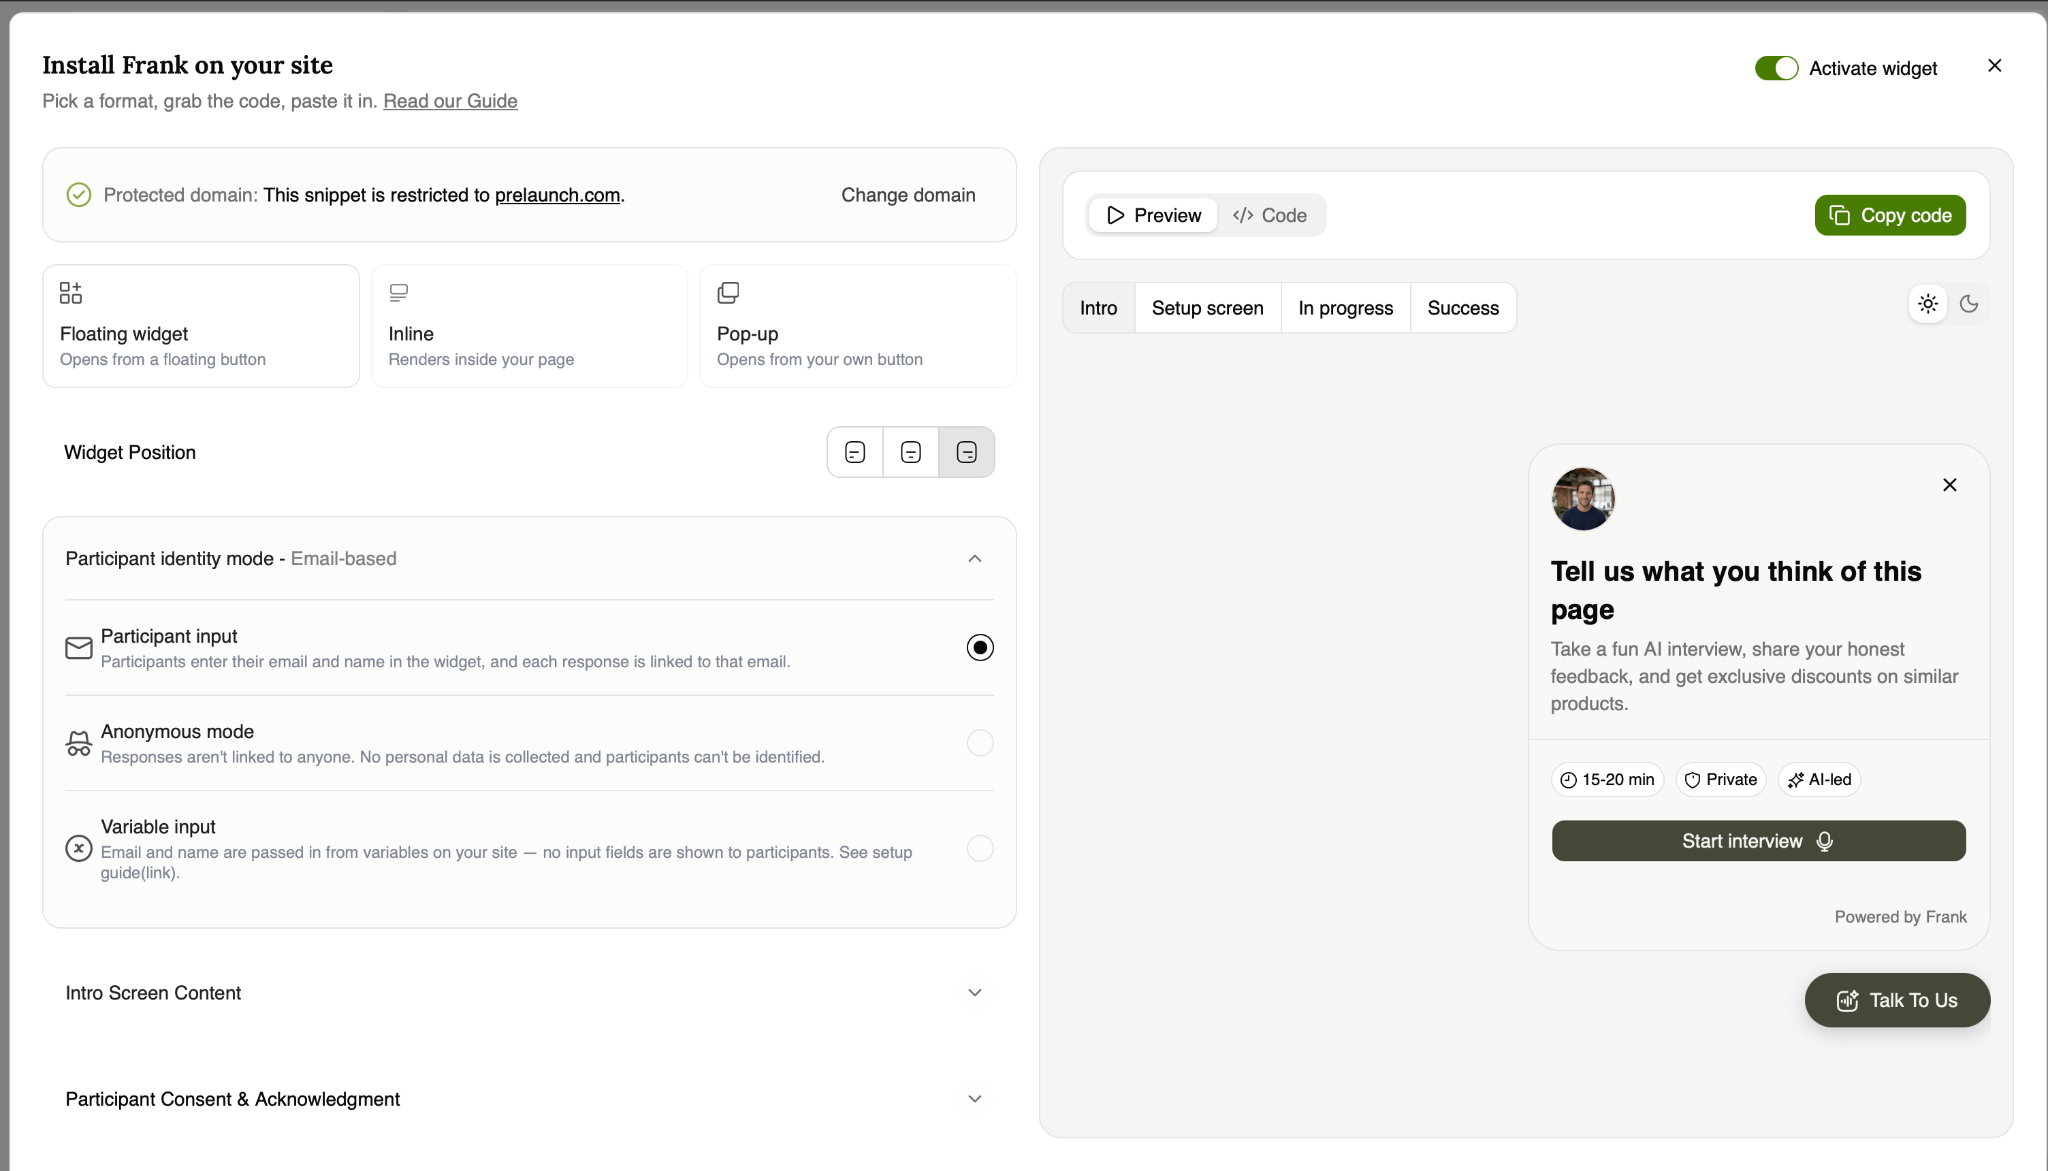
1. Widget Format
Three placement styles to choose from:
- Floating widget — opens from a floating button — currently the only fully available type
- Inline — renders directly inside the page content
- Pop-up — opens from a button the researcher provides on their own site
2. Widget Position
Available for the Floating widget format — three position options let you control where the floating button and panel sit on the page (e.g., left, center, right).
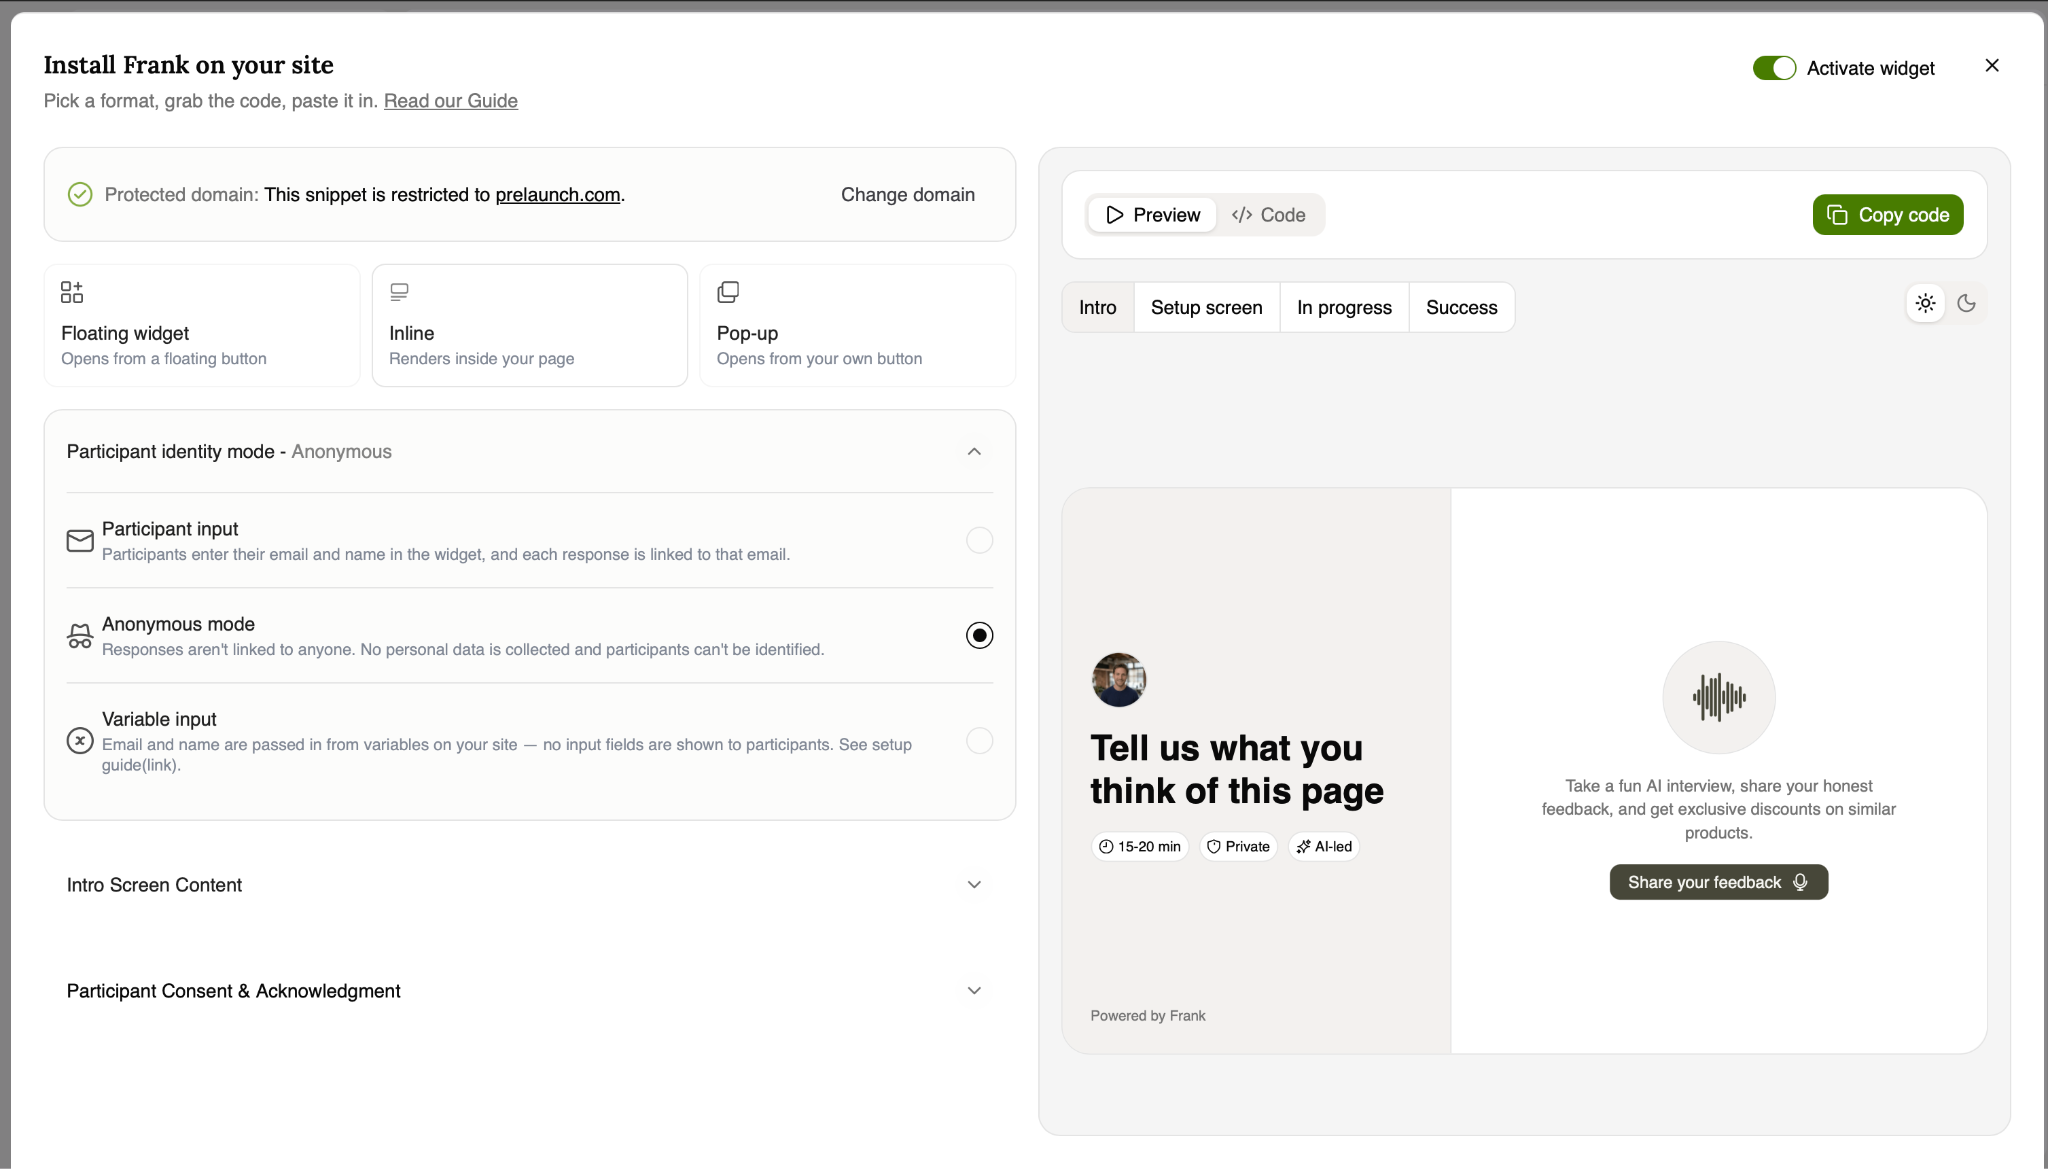
3. Participant Identity Mode
Controls how participants are recognized:
- Participant input (Email-based) — participants manually enter their name and email before starting; each response is linked to that email
- Anonymous mode — no personal information is collected, and the participant cannot be identified
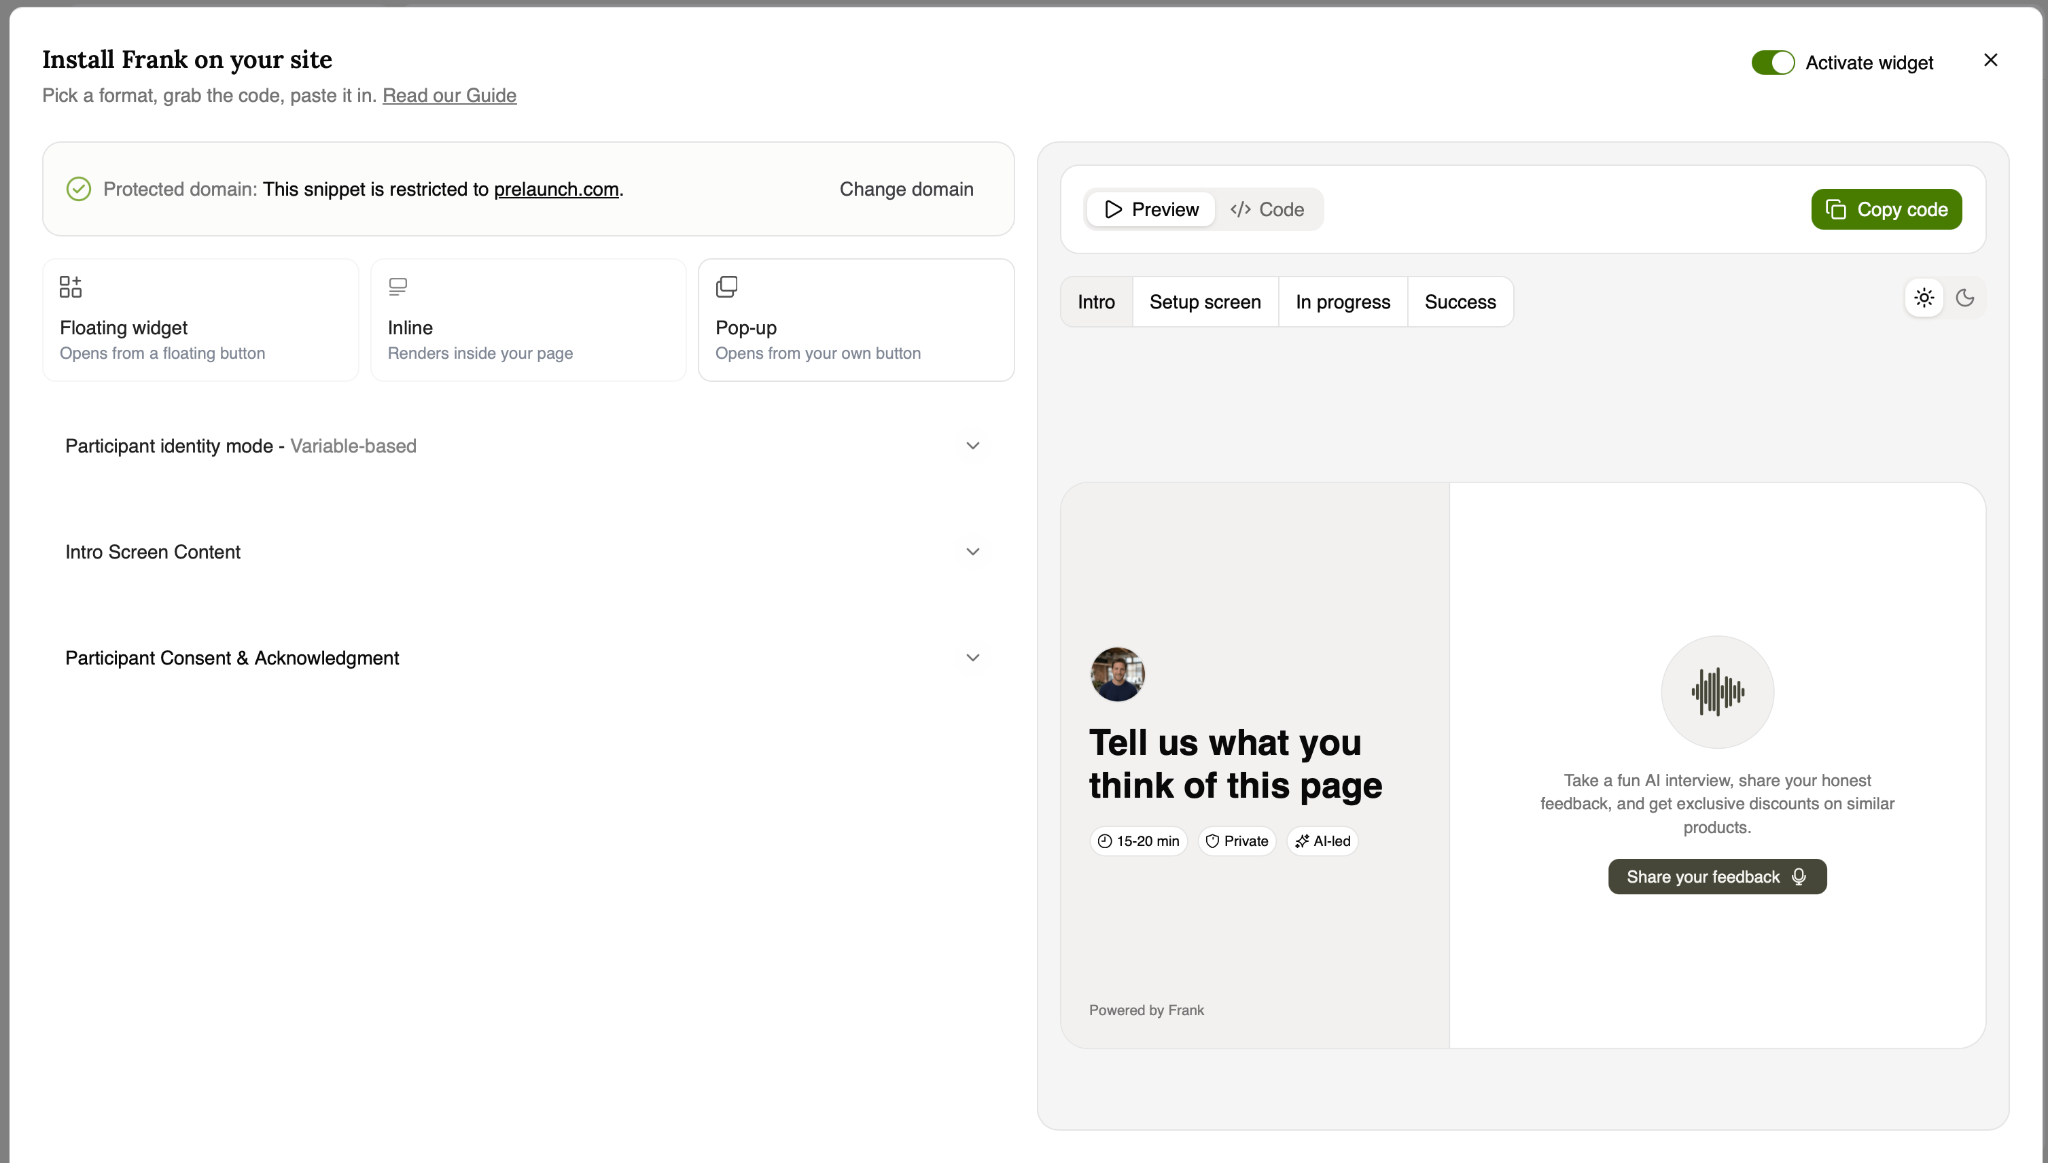
- Variable input (Variable-based) — the website automatically passes participant information via variables, so no input fields are shown to participants
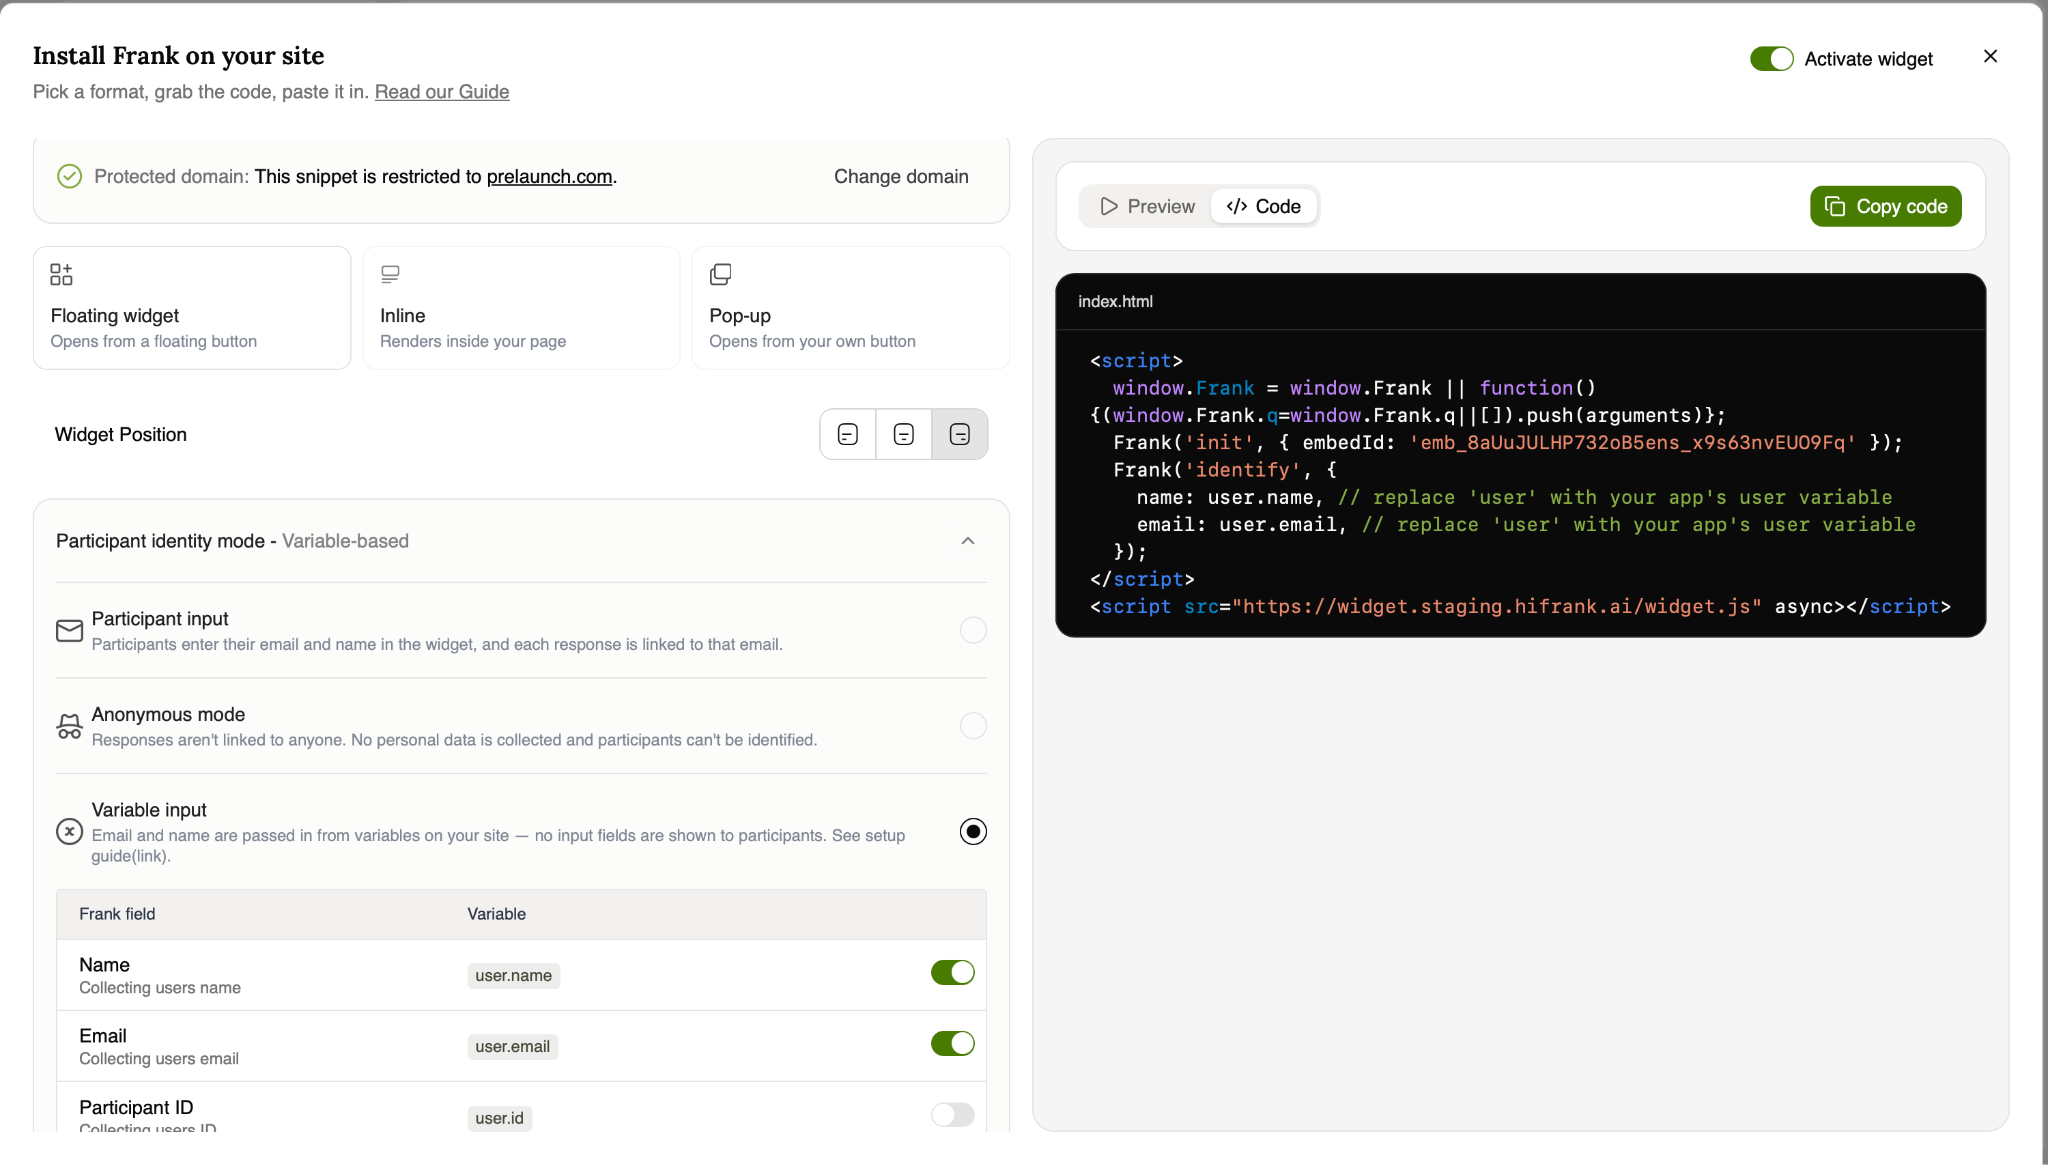
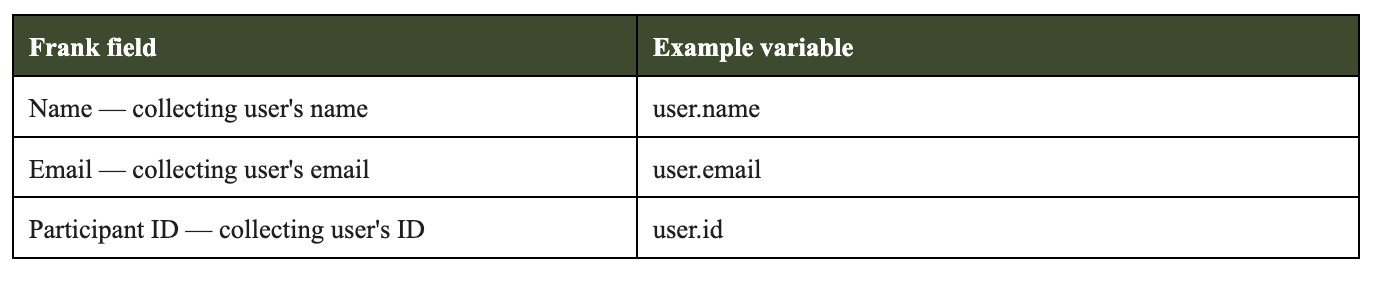
When Variable-based is selected, a Frank field → Variable mapping table appears, letting you map each field to a site variable, with an on/off toggle per field:
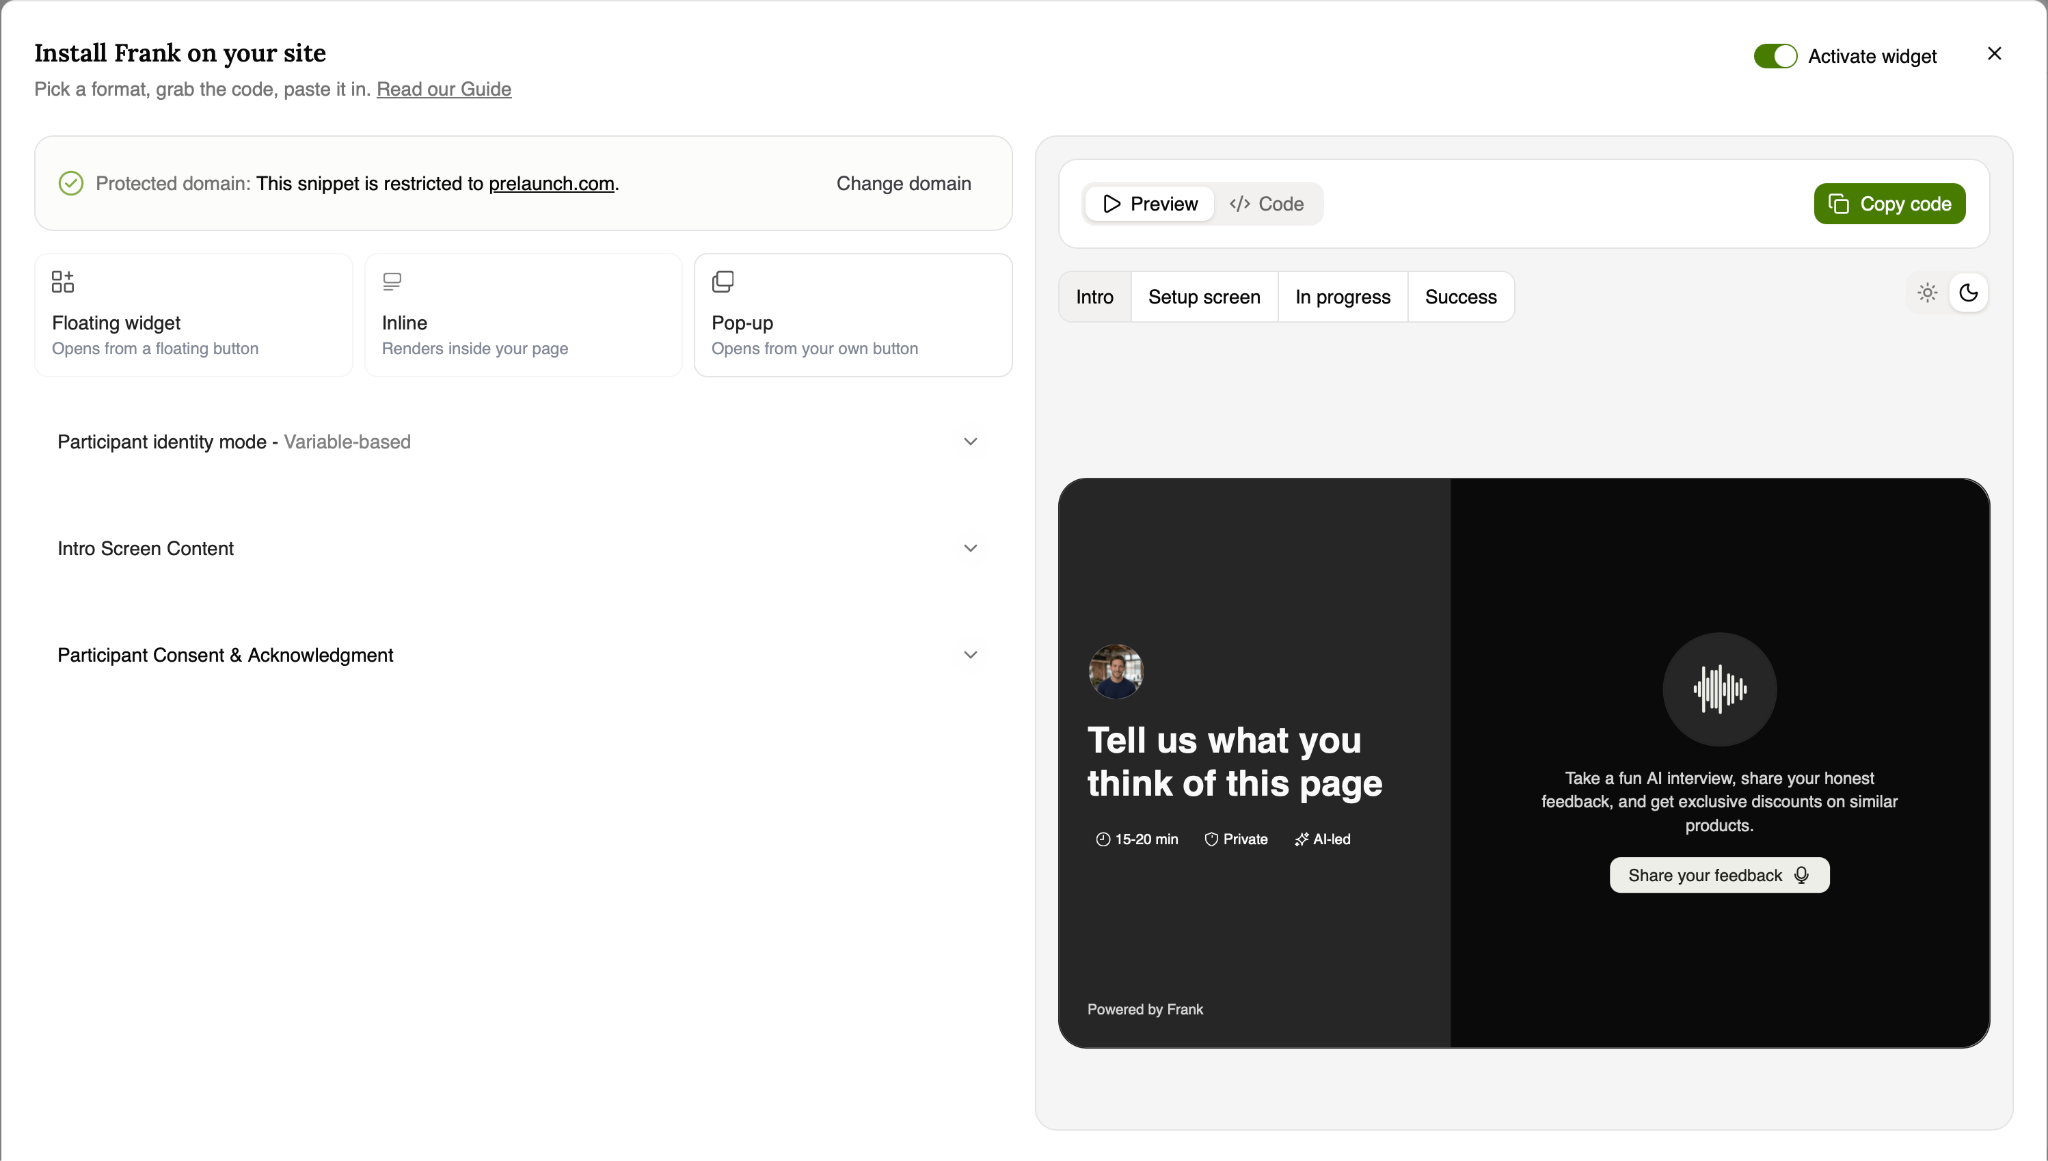
4. Intro Screen Content
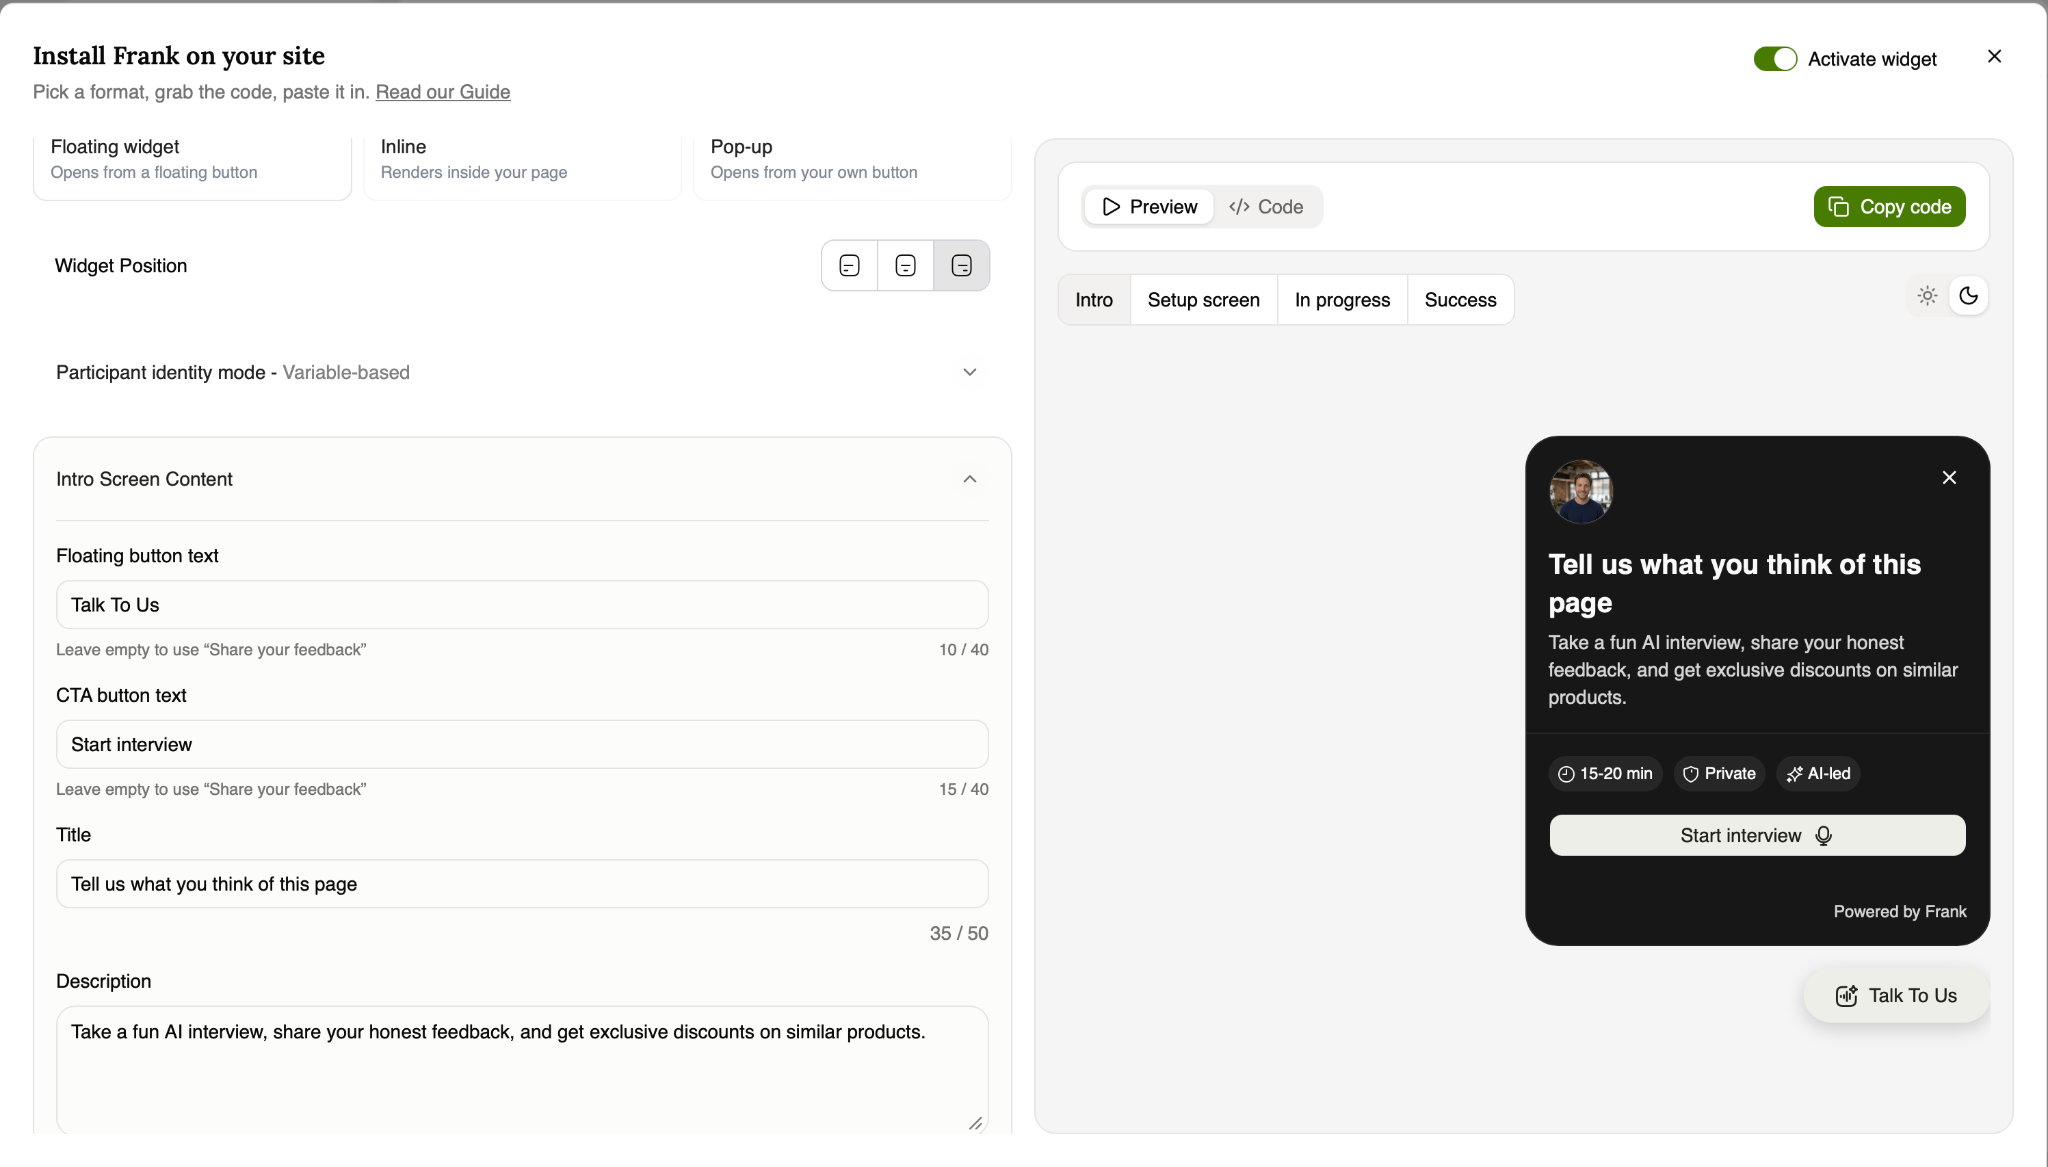
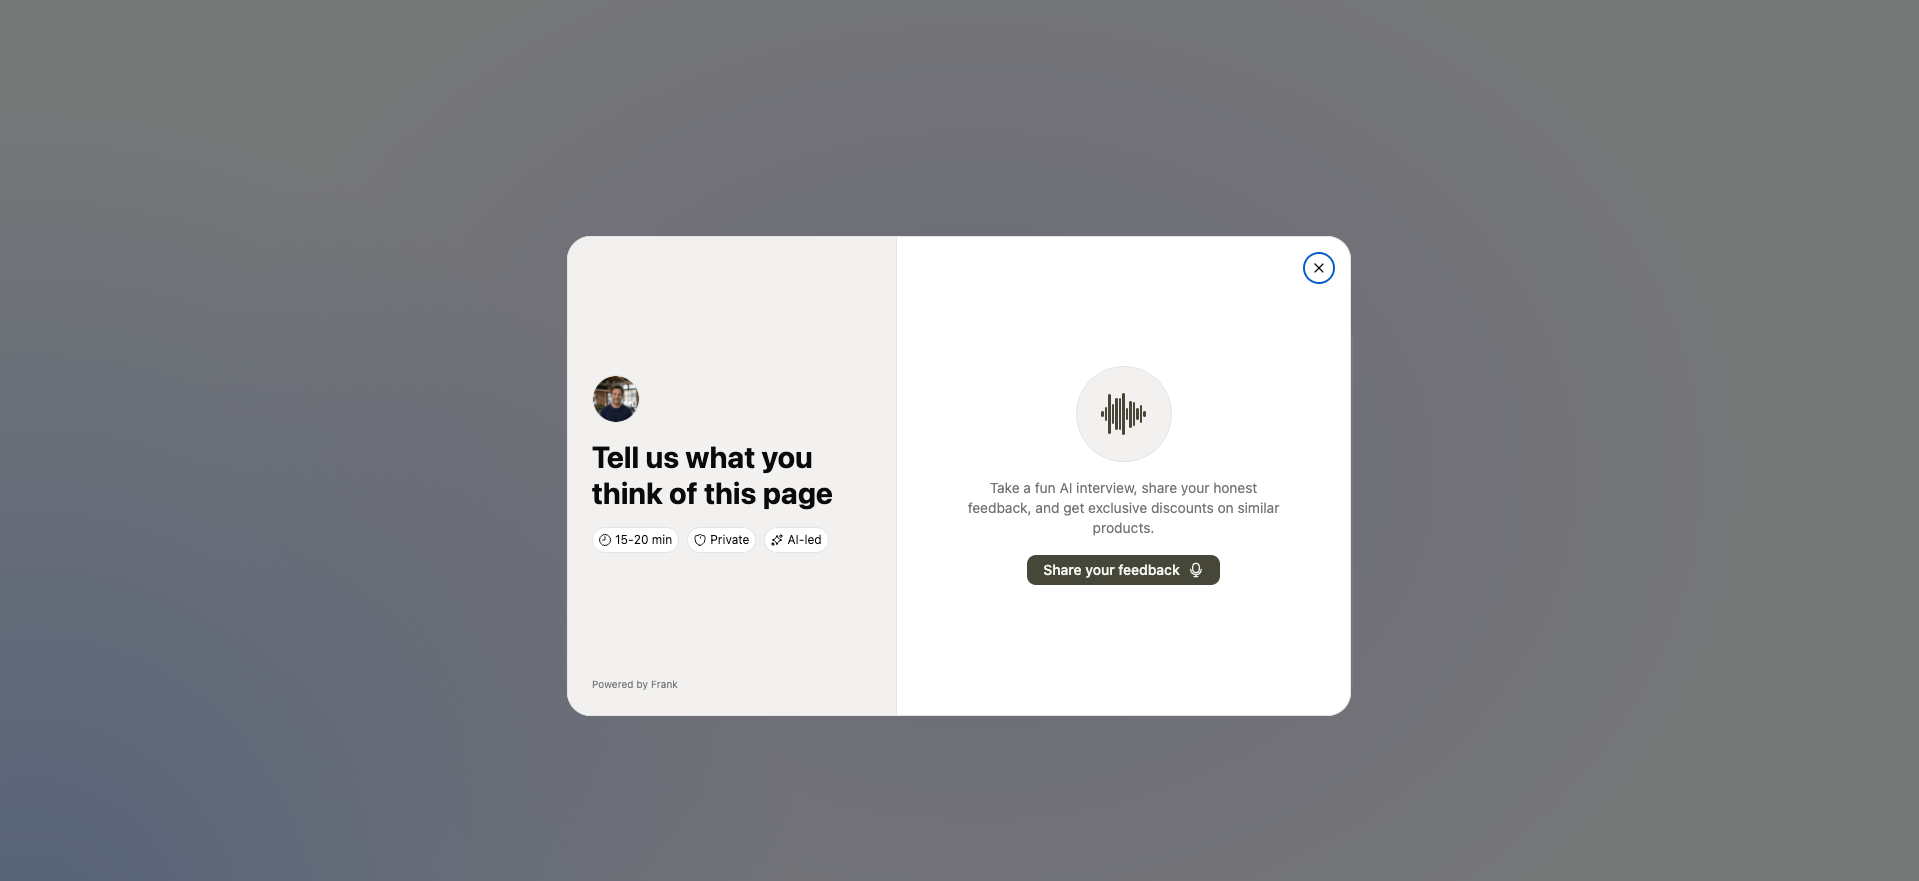
The intro screen is the first screen participants see when they open the widget. Researchers can customize:
- Floating button text — e.g. "Talk To Us" — 40-character limit; defaults to "Share your feedback" if left empty
- CTA button text — e.g. "Start interview" — 40-character limit; same fallback behavior
- Title — e.g. "Tell us what you think of this page" — 50-character limit. Default: "Tell us what you think of this page"
- Description — e.g. "Take a fun AI interview, share your honest feedback, and get exclusive discounts on similar products." Default text shown above.
Tip: Changes to the intro screen appear immediately in the Intro preview and are saved automatically — no separate Save or Cancel action is required. Only the intro screen title and description can be edited; content shown during the interview and on the success screen remains fixed and is managed in Research Setup.
5. Participant Consent & Acknowledgment
Two toggle options control what participants must agree to before starting:
- Show 18+ confirmation notice — displays "By starting, you confirm you're 18 years or older" under the Start button — no checkbox required
- Require consent to session recording — adds an "I agree to this session being recorded" checkbox that participants must tick before starting
Right Panel: Preview & Code
- Preview / Code toggle — switch between seeing the live widget and viewing the install snippet
- Copy code — copies the current install script to your clipboard
- Light / Dark mode toggle — sun/moon icons — preview the widget in either color mode
Four stage tabs let you preview each part of the participant journey:
- Intro — the opening card with title, description, tags (e.g., "15-20 min · Private · AI-led"), and Start button
- Setup screen — the pre-interview "Audio Session" card where participants enter their email/name, tick consent boxes, and confirm microphone access
- In progress — the live call view showing both avatars (interviewer and participant), a timer, mute button, and End call button
- Success — the completion state shown once the interview finishes
Installation Code
The generated snippet (shown under the Code tab) looks like this:
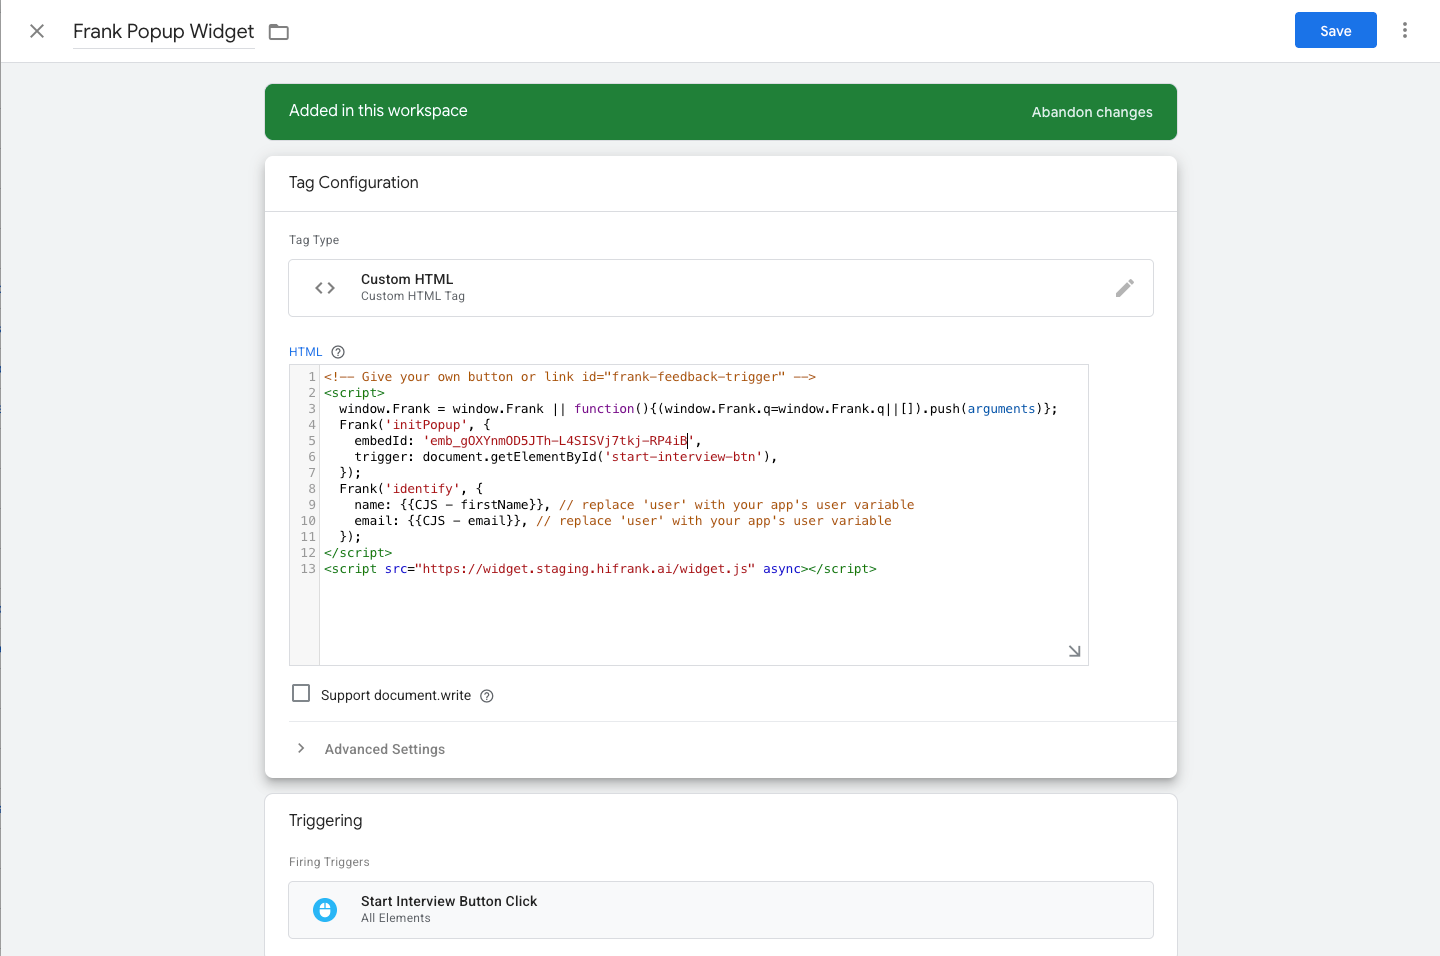
<script> window.Frank = window.Frank || function(){(window.Frank.q=window.Frank.q||[]).push(arguments)};
Frank('init', { embedId: 'emb_...' });
Frank('identify', {
name: user.name, // replace 'user' with your app's user variable
email: user.email,
});
</script>
<script src="https://widget.staging.hifrank.ai/widget.js" async></script>
This is pasted directly into the site's HTML. The identify call is only needed for Variable-based identity — it maps the site's own user variables to Frank's participant fields.
Tip: The installation code always reflects the settings currently selected in the widget configuration — if you change a setting, re-copy the code so your live site stays in sync.
Privacy & Data Access
- The Frank widget runs in an isolated area of your page. It does not use an iframe or communicate with other browser windows.
- Frank’s widget code does not read your website’s cookies,
localStorage, page URL, referrer, UTM parameters, or form data. - The only participant data sent to Frank is information you explicitly choose to pass, such as name, email, participant ID. This data is sent only to Frank’s public embed API.
- Microphone access is requested only after the participant interacts with the widget.
- The widget stores only four short-lived values in the browser tab’s
sessionStorage. These contain random identifiers and queue-related information and are cleared when the browser tab/session ends.
Installing via Google Tag Manager (GTM)
For sites managed through GTM, the widget can be installed using tags, triggers, and variables instead of editing site code directly.
Tag: Frank Floating Widget
A Custom HTML tag containing the standard init script, set to fire on All Pages / Page View so the widget loads on every page.
Tag: Frank Popup Widget
A Custom HTML tag where the script also sets a trigger pointing to a specific button ID on the page (e.g., document.getElementById('start-interview-btn')), so the widget only opens when that button is clicked. It typically also includes an identify call referencing GTM variables (e.g., {{CJS - firstName}}, {{CJS - email}}).
Trigger: Start Interview Button Click
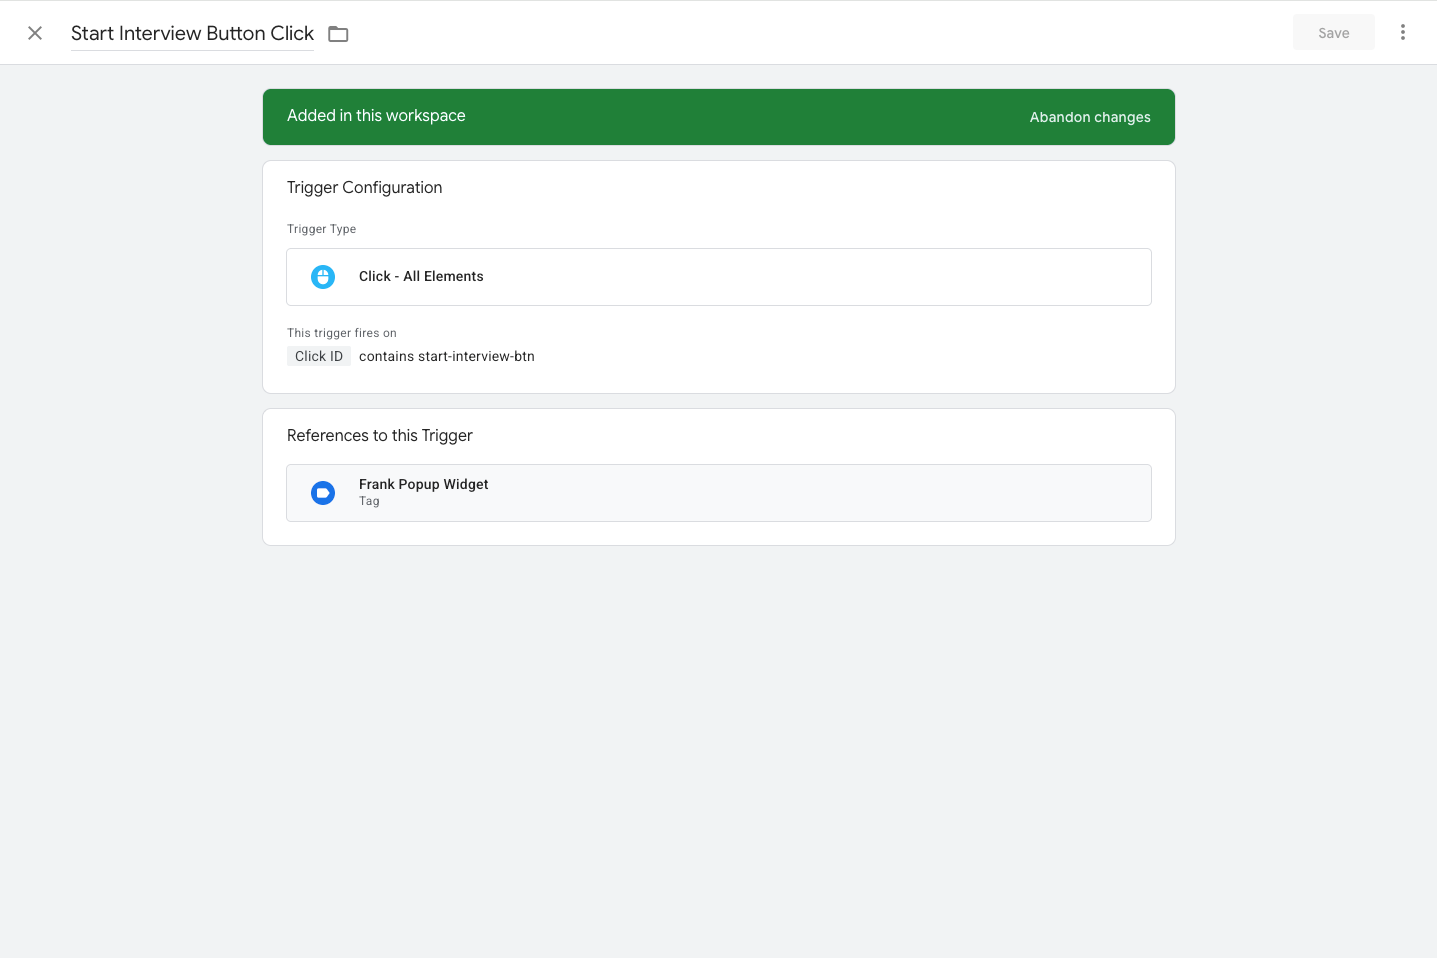
A Click - All Elements trigger configured to fire when Click ID contains start-interview-btn. This trigger is referenced by the Frank Popup Widget tag.
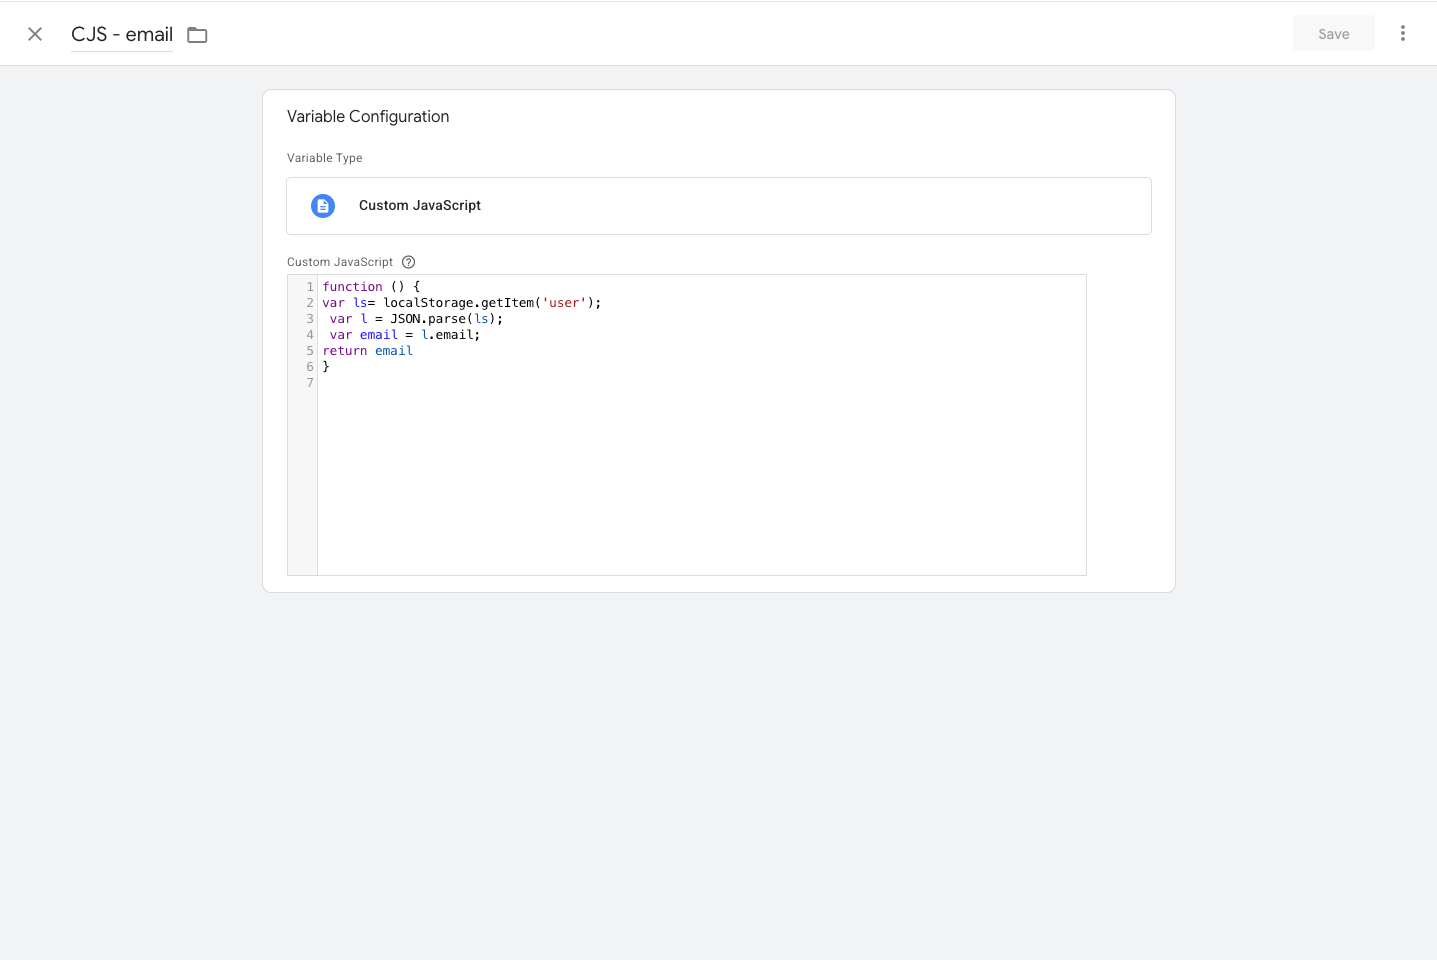
Variable: CJS - email (Custom JavaScript)
A Custom JavaScript variable that reads the logged-in user's email from localStorage, for example:
function () {
var ls = localStorage.getItem('user');
var l = JSON.parse(ls);
var email = l.email;
return email;
}
Widget Availability
The widget follows the same availability rules as the regular Frank interview link — it becomes available when the research is ready to be shared.
If the research is paused or is no longer in a shareable state:
- New participants cannot start an interview
- The widget displays an unavailable or closed state
- Participants who have already started can finish their interview
Tip: Researchers manage availability through the research status rather than activating or deactivating each installed widget separately.
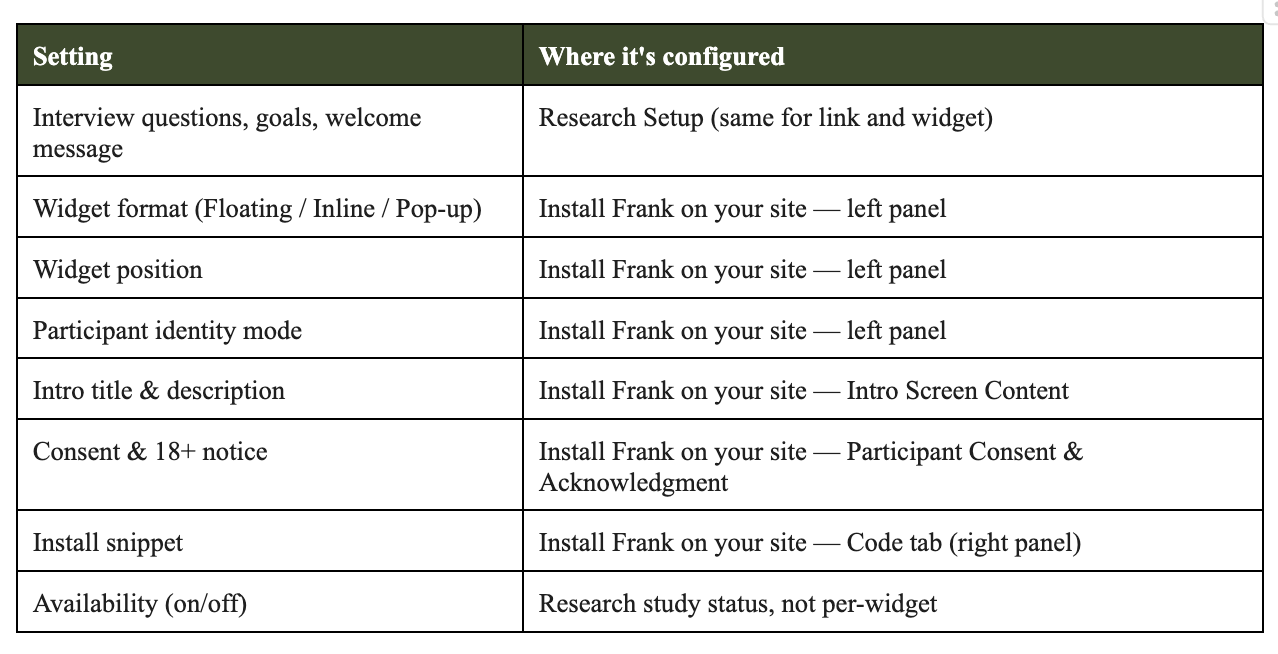
Interview Content vs. Widget Content
The main interview content — greeting, questions, conversational instructions, and completion message — is managed in Research Setup. This content is the same whether a participant joins through a Frank-hosted link or through the website widget.
The widget installation screen only controls content and appearance specific to the embedded experience, including:
- Widget color mode (light/dark)
- Introductory title and description
- Widget position
- Participant identity mode
- Consent options
Quick Reference